How to Fill a Large Planter Without Wasting Potting Mix
Does a tall planter need potting mix all the way down? The honest trade-off of using lightweight filler, which plants should never get it, and the steps for filling a big container properly.
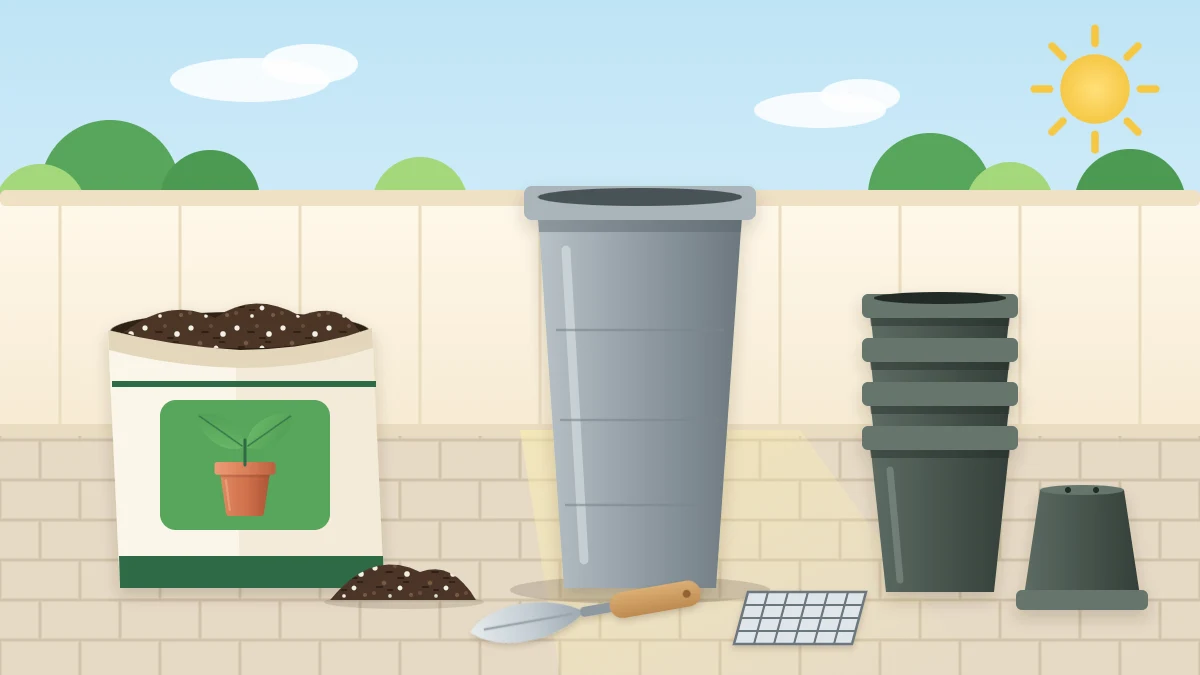
At a glance
What you need
- Large planter with drainage holes
- Potting mix
- Mesh to cover the drainage holes
- Tub or wheelbarrow and a hand trowel
- Watering can or hose
- Clean lightweight filler (optional)
- Landscape fabric (optional)
A tall planter looks wonderful on a patio until you work out how many bags of potting mix it will swallow. That is usually the moment people start searching for how to fill a large planter with something cheaper in the bottom.
There is a way to do that, and there are real costs to it. This guide sets out the trade-off plainly, tells you when filler is reasonable and when to skip it, and then walks through filling the planter step by step.
The honest trade-off
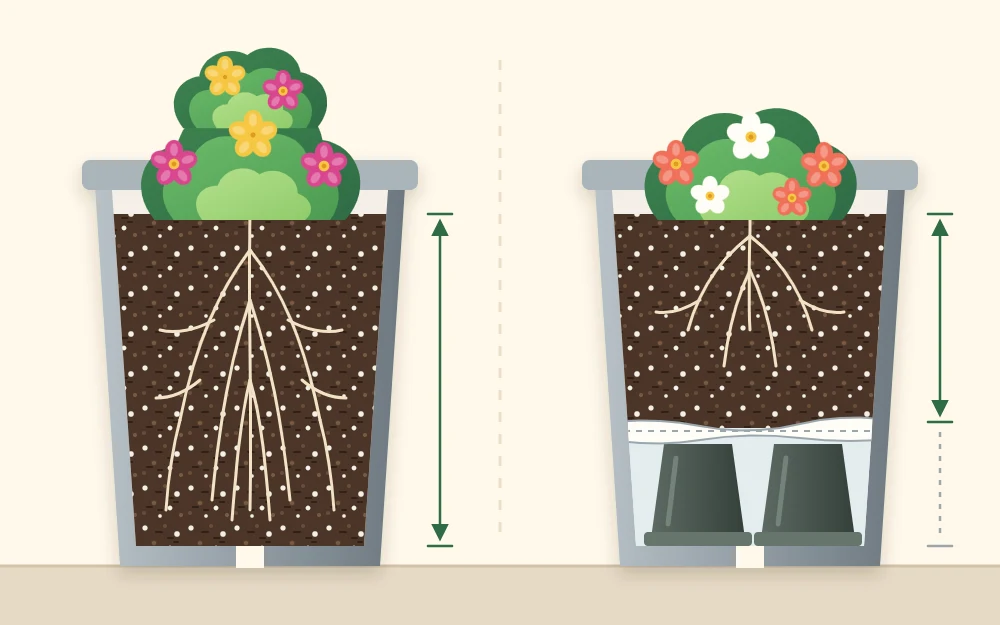
Plants generally do best with the full depth of the container filled with potting mix. More mix means more room for roots and a larger store of water and nutrients, which is the main advantage of a big planter in the first place.
Taking up the lowest part with filler saves mix and weight, but it turns a large pot into a medium one. The roots have less volume to explore, and the planter will dry out faster than it would if it were full. Whether that matters depends on what you are growing.
When filler is reasonable, and when to skip it
Filler can make sense for shallow-rooted annual flowers in a very tall planter, where the roots would never reach the bottom third in one season anyway. It is also worth considering when the finished weight is a concern.
Skip filler entirely for:
- Tomatoes and other deep-rooted vegetables.
- Shrubs, small trees and perennials that will live in the planter for years.
- Any planter that is wide but not especially deep.
- Hot, windy spots where the pot already dries quickly.
If you are unsure how much root room your plants want, the guide to what size pot different plants need gives commonly suggested starting points.
How much mix to leave above the filler
Keep an ample depth of potting mix on top. For annuals, at least 12 in (30 cm) is a commonly suggested minimum, and more is better. Check the plant tag, since larger varieties want deeper root runs.
What to use as filler, and what filler does not do
Good filler is clean, sturdy, lightweight and will not rot or collapse. Two easy options are empty plastic nursery pots turned upside down, and empty plastic bottles with their caps screwed on tight. Arrange them so they are stable and leave gaps for water to find its way down.
Avoid anything that breaks down or holds water, such as wood scraps, cardboard, sponges or packing material of unknown make. For edibles, use only clean items that have not held chemicals or unknown substances.
Filler is not a drainage aid. A layer of gravel, stones or anything else coarse in the bottom does not help water leave the pot; the reasons are explained in the guide to container drainage and the gravel myth. Whatever you put in, never cover or block the drainage holes.
Before you start
Gather your materials: enough potting mix, a piece of mesh for each drainage hole, a tub and trowel for dampening the mix, and filler plus a sheet of landscape fabric if you are using them. Use a mix made for pots, not soil from the yard; the guide to potting mix for containers explains the difference.
Good to know
A large planter full of wet mix is very heavy and awkward to move. Put it in its final position before filling, or on a wheeled caddy rated for the load. On a balcony or roof terrace, check your building’s rules and what the structure is designed to carry.
How to fill the planter, step by step
- Position the planter. Set it where it will stay, and check that it stands level and that the drainage holes are open. Raising it slightly on pot feet keeps the holes clear of the paving.
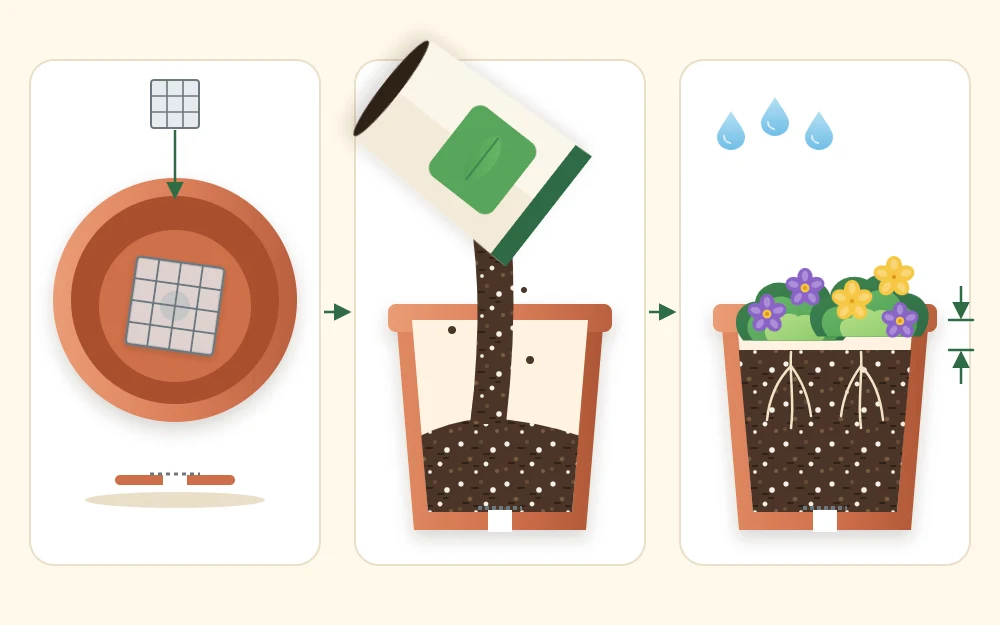
- Cover the holes with mesh. Lay a small piece of mesh over each hole to keep mix in while letting water out.
- Add filler, if you are using it. Place upturned pots or sealed bottles in the lowest part only, keeping them off the holes. Lay a sheet of landscape fabric over the top so mix does not wash down into the gaps. Fabric lets water through; plastic sheeting does not, so do not substitute it.
- Pre-moisten the mix. Tip the mix into a tub, add water gradually and turn it until it is evenly damp, like a wrung-out sponge. Damp mix is less dusty and settles more evenly than dry.
- Fill in layers. Add several inches at a time and press each layer lightly with your hands to close large air pockets. Firm it gently; do not pack it hard.
- Stop below the rim. Leave a couple of inches (about 5 cm) between the surface and the rim so water has somewhere to sit while it soaks in.
- Plant. Set each plant so the top of its root ball is level with the surface of the mix, fill around it and firm lightly.
- Water thoroughly. Water slowly until it runs from the drainage holes. This settles the mix around the roots.
After planting: settling and topping up
Potting mix settles over the first few weeks, more so in a deep planter. If the surface sinks and roots begin to show, add fresh mix around the plants to bring the level back up, without burying the stems deeper than they were.
From here, check moisture by feeling the mix a couple of inches down, not by the calendar. Conditions vary from pot to pot, and a planter with filler holds less water than its size suggests, so expect it to need checking more often in hot or windy weather.
Other ways to save on potting mix
Filler is not the only option. If the cost of mix is the real worry, consider these first:
- Choose a planter that fits the plants. A container of sensible depth for what you want to grow needs no filler at all.
- Use a pot inside the planter. Stand a smaller draining pot on a stable support inside the tall planter, as long as water can still escape from the outer container.
- Buy mix in larger bags. Big bags and compressed bales usually work out cheaper per quart than small ones.
- Refresh instead of replacing. Healthy mix from the previous season can often be blended with new mix instead of being thrown away.
Frequently asked questions
What can I put in the bottom of a large planter to take up space?
Use clean, sturdy, lightweight items that will not rot, such as empty plastic nursery pots turned upside down or empty plastic bottles with the caps on. Keep them clear of the drainage holes and cover them with landscape fabric before adding mix. Remember the planter will then dry out faster than a full one.
Do I have to fill a deep planter all the way with potting mix?
For tomatoes, shrubs, perennials and other deep-rooted or long-lived plants, yes, the full depth is the better choice. For shallow-rooted annual flowers in a very tall planter, the lowest part can be taken up with filler, provided a generous depth of mix, commonly at least 12 inches, remains above it.
Why has the potting mix in my planter sunk?
Settling is normal. Watering closes air pockets and the mix compresses a little under its own weight, especially in deep containers. Add fresh mix around the plants to restore the level, keeping the stems at the depth they were planted and leaving a gap below the rim for watering.

